
The moment you’ve all been waiting for….the last photo is FINALLY finished!!! YAH!!!!
WARNING
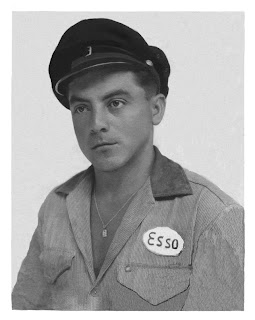
(Sorry, but your about to read a long endless supply of writing that is as long as an essay but I'll try and explain what I did using less paragraphs as possible but I'll make no guarentees...)Anyways, this was the hardest of the three photos by far. They call this one “the gas guy.”
I took my time with this one and started fixing the easiest pieces of “the gas guy” first, (I figure that if you start with the small things you can get the big things out of the way much faster…or maybe it’s just me?). So I started with his ear, (simple enough). I took a medium sized stamp tool and took pixels from a complete part of his ear, then quickly fixed the little rip and used a smaller stamp tool to touch up the ear so that there was no pixely look and I used it to help round off the ear, making it look more natural.
Next I moved to the background. Here I took pixels from the lighter shades of the background and filled in the rest of the background using that specific shade. It didn’t take too long and the only trouble spots were trying to redraw the borders around the photo, but again it took only a few seconds to fix.
My next target was the wide brim of his hat. This portion of the assignment took a fair bit of time. First I fixed the hair underneath the hat (using medium and small sized stamp tools) and then I moved to the shadow of the brim which took awhile because for some strange reason when I tried to sample pixels around the ripped or patchy areas, the gray colour would come out a different shade then what was there, so I had to adjust and move to other places of the body to find the shade of gray that fit that area. Next I played around with his hat and patched over the faded out dark shade with a darker almost black shade, to make the hat brand new (also touched up the shadowy lines on the hat and the belt thing that runs through the bottom half of it). The brim took awhile since I had to re patch it in and shape it. This took forever...There were times where the brim would look un-even or out of place, or had different shades of gray.
I worked on the chest area and the little necklace he was wearing next. These didn't take too long to fix. The necklace gave me a small bit of trouble because it would repeat itself just above where it orignially was and would look like a random chain coming out of his skin. So I fixed the shain with small stamp tools and continued to fix the white patches and shadow on his chest.
My next target was the "Esso" tag on the right side of his shirt. This part took little to no time. First I tried to fix the area of his shirt around the Esso label using medium/ small stamp tools. This took some time because again, the shirt has a lined pattern through it so if I didn't get the right pixels in the right place, the lines would go crooked and the pattern would look pixely or strange. I started with the second "S" on the Esso sign and pretty much took pixels from the first one to make the second one look complete. Next I patched up some of the little patches inside the label and slowly began to replace the stained portion of the label with the grayish colour of the label.
Now the hardest area of the whole picture came forward and I had to face it....the huge stain on the "gas Guy's" shirt in the bottom right of the photo. The shirt was a nightmare. One you didn't want to face but had to. So I selected small stamp tools and got to work. I started with the little white patchs on his collar working my way to the stain. I started by slowly fixing the shirt on the outer region of the shirt then I started to slowly move in on the stain from the top. I fixed the shoulder using small stamp tools then moved to the stain again until I came to the pocket of the shirt. Then I worked on the left arm of his shirt (yes it's his left arm, turn to face in the same position and you will know that its his left arm, even if it is on the right...). This was the hardest area next to the stain (since it had the stain, rips, patches and it was cutoff from the side).
Yes, it came out pixely. Why? Because there wasn't a good place to sample the pattern of the shirt to fit the direction of the ripped/patched/ stained portions of the arm, so I had to try and create it from scratch. I took some pixels from the shirt (which had the pattern going in the right direction) and tried to fix the arm. It became pixely when I used the same pixels too much. The top part of the arm, near the shoulder had lines moving in a different direction than the bottom part of the arm and it took forever to link up the two. I gave up trying to fix it after the third attempt (which made it look worst, so I didn't save it and started from before I edited it).
Next I tried to fix the folds on the shoulder and near the chest. The stain kind of fused with the shadow and I tried to use it to seperate the shoulder, from the arm (worked alittle but you can see what was the stain and what was shadow).
Lastly I fixed the rest of the rips/ patches in his shirt and moved to the pocket. Extremly hard...The pocket was covered in the stain and was challenging to uncover. First I had to remove the stain. This took about a week (using medium/ small stamp tools and slowly using pixels from the shirt to fix the pocket), next I made sure the pocket was the right shade of gray and that it matched the picture (took forever...). Finally I fixed the top of the pocket (to make sure the shading/ top part was there) then worked on the bottom part. The bottom part took another day to fix since it had stains under there too. I cleared those away using pixels from other parts of his shirt, then used the stain to form a small shadow under the pocket (to seperate the pocket from the shirt).
I looked it over one last time, then posted it for your viewing pleasure...

Start

Day 1-3

Day4-6
Finished...
In the end I decided to post 4 slides of my progress since this photo was the most time consuming and I put the most effort into making it look half decent. So enjoy.


